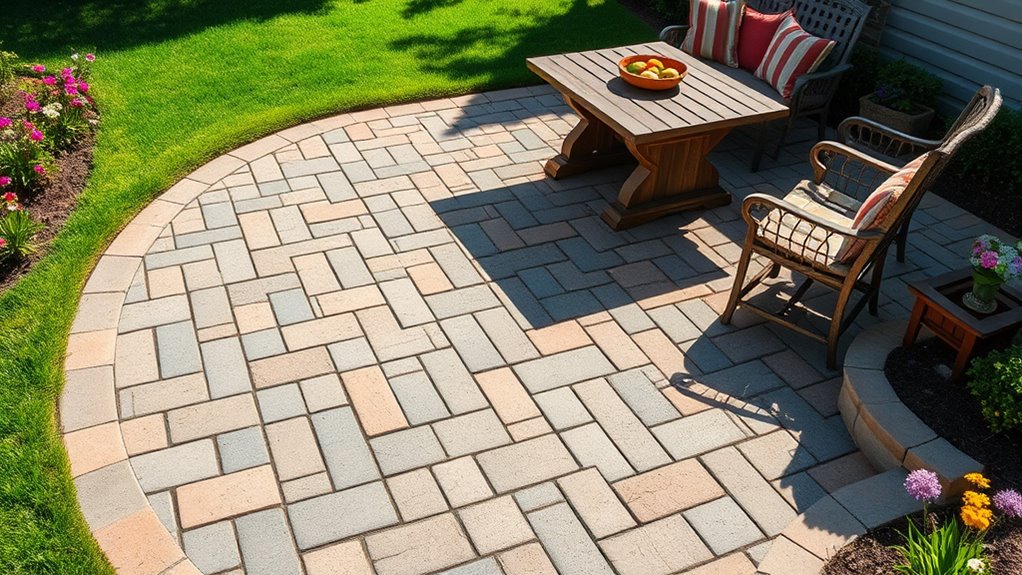

To build a DIY paver patio, start by planning your layout and choosing durable materials that match your garden style. Prepare the site by clearing debris and excavating for a stable base, then lay a gravel foundation. Carefully lay the pavers, ensuring even spacing and level placement, and fill the joints with sand or polymer material. Incorporate lighting and garden features to create a cozy outdoor living space—keep going to discover detailed steps for a successful project.
Key Takeaways
- Plan your patio layout considering size, shape, and intended use like dining or lounging.
- Select durable, weather-resistant pavers that match your aesthetic and budget.
- Prepare the site by clearing debris, excavating, and installing a stable gravel base.
- Lay pavers systematically, ensuring consistent spacing, and fill joints with sand or polymeric material.
- Enhance the space with outdoor lighting and garden elements for a welcoming, functional area.

Are you ready to transform your backyard into an inviting outdoor space? Building a DIY paver patio is an excellent way to enhance your garden design and create a cozy spot for relaxation or entertaining. By carefully planning your project, you can craft a beautiful and functional area that matches your style. The first step is to visualize the layout and determine the size and shape of your patio. Consider how you’ll use the space, whether for dining, lounging, or gardening, and plan accordingly. Incorporate outdoor lighting into your design to add ambiance and improve safety during evening gatherings. Subtle string lights, solar path lamps, or built-in LED fixtures can all work wonders to make your patio inviting after sunset.
Visualize your perfect patio and plan your outdoor lighting to create a warm, inviting space for evenings.
Next, focus on selecting the right pavers for your project. You want durable materials that complement your garden design while fitting your budget. Concrete pavers are popular because they’re affordable and come in many shapes and colors. Natural stone offers a more rustic, elegant look but may require a larger investment. Once you’ve chosen your pavers, prepare the site thoroughly. Clear the area of grass, roots, and debris. Excavate to a depth of about 6-8 inches, ensuring your patio will be level and sturdy. Install a base layer of crushed stone or gravel, then pack it down firmly. This foundation is essential for preventing shifting or sinking over time.
Lay out your pavers carefully, starting from one corner and working your way outward, maintaining consistent spacing. Use a rubber mallet to tap the pavers into place and ensure they sit evenly. For added stability, fill the joints with sand or polymeric jointing material, which helps lock everything in place and prevents weed growth. Once your patio is complete, you can go a step further by integrating outdoor lighting into the design. Embed solar-powered lights into the edges or place string lights overhead to highlight the space. Proper lighting not only enhances the visual appeal but also ensures safety and usability during nighttime. Remember to test your lighting options before finalizing their placement, so you achieve the perfect ambiance. Additionally, understanding your PlayStation Support Hours can be helpful if you encounter any technical issues with outdoor entertainment systems or smart lighting setups.
Incorporating garden design principles into your paver patio can make the space feel cohesive and welcoming. Add potted plants, flower beds, or a small water feature nearby to soften the edges and bring color and life to your outdoor living area. With a little effort and attention to detail, you’ll create a stunning paver patio that becomes the heart of your backyard, perfect for relaxing, entertaining, and enjoying your garden for years to come.

AMERLIFE 10x12 FT Heavy Duty Aluminum Greenhouse with 4 Roof Vents & Rain Gutter, Polycarbonate Greenhouse for Outdoor Garden Backyard, Black
- All-Weather Construction: Durable aluminum frame with secure anchoring
- Unbreakable Polycarbonate Panels: UV-protected panels block 99.99% of harmful rays
- Enhanced Ventilation: Four adjustable skylights for optimal airflow
As an affiliate, we earn on qualifying purchases.
Frequently Asked Questions
How Long Does a DIY Paver Patio Project Typically Take?
A DIY paver patio project usually takes about 3 to 7 days, depending on your planning and material selection. You’ll want to spend time on project planning to organize your steps and gather materials efficiently. The actual construction might be quicker if you have experience, but setting a realistic timeline helps. Rushing can lead to mistakes, so take your time to make certain a durable, attractive outdoor space.
What Tools Are Essential for Building a Paver Patio?
You’ll need a variety of hand tools and power tools to build your paver patio. Essential hand tools include a tamper, level, pry bar, and shovel for preparing the base and laying the pavers. Power tools like a masonry saw help cut pavers precisely, while a drill assists with setting edge restraints. Additionally, having a rubber mallet and broom makes adjusting pavers and cleaning up easier throughout the project.
How Do I Prevent Weeds From Growing Between Pavers?
Think of your paver joints as tiny cracks in a fortress wall—weed control is your best defense. To keep weeds at bay, regularly apply joint filling material, like polymeric sand, which acts as a barrier. After sweeping it into the gaps, lightly mist with water to activate it. This creates a solid, weed-resistant seal, ensuring your patio remains pristine and weed-free for years to come.
Can I Install a Paver Patio on Uneven Ground?
Yes, you can install a paver patio on uneven ground by performing ground leveling and proper base preparation. First, remove debris and high spots, then use a shovel or tamper to level the surface. Add a layer of gravel or sand to create a stable, even base. Compact the base thoroughly to prevent shifting. This ensures your paver patio remains level and durable over time.
What Is the Best Way to Maintain and Clean the Pavers?
To keep your pavers looking great, regularly sweep away debris and wash them with a hose or gentle pressure washer. Apply paver sealing every few years to protect against stains and weather damage. To prevent weeds, use weed prevention fabric beneath the pavers and consider applying a weed killer if needed. Proper maintenance keeps your outdoor space vibrant, durable, and easy to enjoy year-round.
Conclusion
Now that you’ve laid your paver masterpiece, your outdoor space transforms into a vibrant oasis. Remember, this project is like planting seeds—you’ll enjoy the fruits of your labor for years to come. With patience and attention to detail, you’ve built more than a patio; you’ve crafted a sanctuary for relaxation and gatherings. So step back, admire your work, and get ready to create countless memories on this beautiful foundation you’ve laid with your own two hands.