To install a programmable thermostat, turn off your HVAC system to prevent electrical hazards. Remove the old thermostat and note or photograph the wiring for reference. Connect the wires to the new thermostat’s matching terminals, ensuring secure and correct connections. Mount the device on the wall, then turn the power back on. Follow the setup instructions to connect to Wi-Fi and program your preferences. If you’re curious about more detailed steps, many helpful tips await you.
Key Takeaways
- Turn off HVAC power and remove the existing thermostat, noting or photographing wiring connections for reference.
- Verify compatibility, wiring, and voltage requirements before connecting the new programmable thermostat.
- Mount the thermostat securely on the wall, ensuring proper wiring to corresponding terminals (R, C, G, Y, W).
- For Wi-Fi models, connect to your home network following manufacturer instructions and set up the app.
- Power on the system, test programming functions, and adjust settings to ensure proper operation and energy efficiency.

Installing a programmable thermostat is a straightforward way to improve your home’s energy efficiency and save money on utility bills. Before you start, it’s important to check the wireless compatibility of your new thermostat. Many modern models offer Wi-Fi connectivity, allowing you to control your heating and cooling remotely through a smartphone app. This feature can be a game-changer for managing your home’s climate efficiently, especially if you’re often away. Confirm that your existing Wi-Fi network is stable and that the thermostat is compatible with your home’s wireless system. Additionally, verify the voltage requirements of the thermostat. Most residential thermostats operate on low-voltage systems, typically 24 volts, but some older homes may have higher voltage systems that require a different type of thermostat or additional wiring. Confirming this beforehand prevents potential installation issues and guarantees your new thermostat functions correctly.
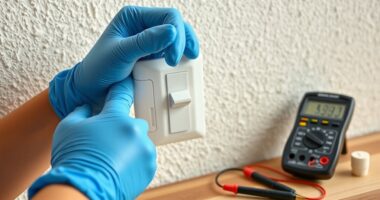
Once you’ve checked these compatibility points, turn off the power to your HVAC system to avoid electrical hazards. Remove the old thermostat carefully, noting how the wires are connected. Take a picture if needed, so you can reference it when wiring your new thermostat. The next step involves identifying the wire terminals on your current setup—common labels include R, C, G, Y, and W. Your new thermostat should come with a wiring diagram; compare this with your existing setup to make sure all wiring matches. If your new thermostat supports wireless connectivity, you’ll likely need to connect it to your Wi-Fi network during setup. Follow the manufacturer’s instructions carefully to link your device wirelessly, which often involves entering your Wi-Fi credentials into the thermostat’s interface. Understanding the importance of contrast ratio can help you choose a thermostat with a clear display that remains visible in various lighting conditions.
Mount the new thermostat on the wall, ensuring it’s level and securely attached. Connect the wires to their corresponding terminals, making sure each connection is firm and correct. For thermostats with wireless capabilities, the setup process may include downloading an app, creating an account, and connecting the device to your home network. Once installed, turn the power back on and follow the calibration instructions to guarantee the thermostat accurately reads your home’s temperature. Test the system by setting different temperatures and confirming the heating or cooling activates as intended. Remember, proper wiring and confirming voltage compatibility are essential for safe and effective operation. With everything in place, you can now enjoy the convenience of programmable scheduling and remote control, helping you optimize energy use and reduce costly utility bills.
Frequently Asked Questions
Can I Install a Programmable Thermostat Myself Without Professional Help?
You can definitely try DIY installation if you’re comfortable with basic wiring, but consider compatibility considerations first. Check your current thermostat’s wiring and your HVAC system’s requirements to guarantee compatibility. Follow the thermostat’s instructions carefully, turn off power before starting, and use proper tools. If you’re unsure at any step, it’s safer to consult a professional. Proper installation guarantees efficiency and safety for your heating and cooling system.
What Compatibility Issues Should I Consider Before Purchasing a Thermostat?
Before buying a thermostat, you should do a compatibility check to ensure it works with your HVAC system. Check if your wiring requirements match the thermostat’s needs, especially if you have a newer or older setup. Consider the type of heating and cooling systems you have, like a heat pump or multi-stage system, to avoid compatibility issues. This way, you’ll guarantee smooth installation and peak performance.
How Do I Troubleshoot if the Thermostat Isn’t Turning On?
When your thermostat isn’t turning on, start by checking the power supply, ensuring it’s plugged in or the circuit breaker isn’t tripped. Next, examine the sensor calibration, making sure the thermostat accurately detects temperature changes. If these steps don’t work, replace batteries if applicable, inspect wiring connections, or consider resetting the device. By troubleshooting power supply issues and sensor calibration, you can quickly identify and fix the problem.
Are There Specific Safety Precautions During Installation?
When installing a programmable thermostat, you should prioritize electrical safety and tool precautions. Always turn off the power at the circuit breaker before starting to prevent shocks. Use insulated tools to avoid accidental contact with live wires. Be cautious with wiring connections, confirming they are correct to prevent short circuits. Following these safety tips helps protect you and ensures a smooth installation process.
How Do I Program Different Temperatures for Weekdays and Weekends?
To set different temperatures for weekdays and weekends, you’ll need to access your thermostat’s programming menu. Use the temperature scheduling feature to customize your desired comfort levels for each day. Typically, you can set weekday schedules with lower temperatures during work hours and higher when you’re home, and adjust weekend settings for relaxation. Proper temperature scheduling maximizes energy savings and keeps your home comfortable all week long.
Conclusion
Now that you’ve installed your programmable thermostat, you’re in control of your home’s comfort and energy use. Remember, this device isn’t just a gadget—it’s the key to smarter living. Think of it as the heartbeat of your home’s climate, always working behind the scenes to keep things just right. So, embrace this new tool with confidence, knowing that every programmed setting is a step toward a more efficient, cozy, and cost-effective home.