Building a DIY shelf is quick and rewarding! Start by gathering 2×4 lumber for a sturdy frame. Cut the wood for the legs and secure them with 3-inch screws. Create horizontal supports and attach plywood on top, letting it overhang for a stylish finish. Make sure everything is level and stable for durability. This shelf not only adds functional storage but can give your space a personal touch. Keep going to uncover more tips and tricks!
Key Takeaways
- Gather materials: 2×4 lumber and plywood for a sturdy shelf framework and surface.
- Measure and mark wall stud locations for secure attachment and stability.
- Cut and assemble 2x4s for legs and horizontal supports using 3-inch screws.
- Cut plywood to size, ensuring it overhangs for a finished appearance.
- Secure plywood to the frame with smaller screws for a solid storage surface.
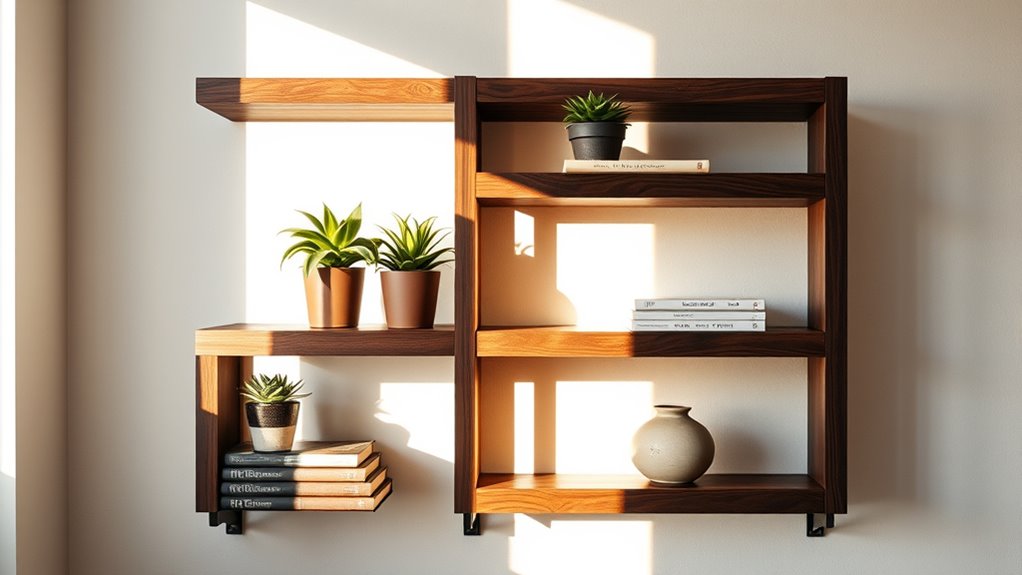
Building your own shelf can be a rewarding project that enhances both your space and skills. If you’re looking to add some functional storage to your home, you’re in the right place. I’m going to guide you through the essential steps to create a sturdy and stylish shelf using basic materials.
First, you’ll want to gather your materials. You’ll need 2×4 lumber for both the shelving and the legs, as it’s strong and reliable. When you’re ready to start, make sure to measure and mark the location of your wall studs. This is crucial for attaching your shelf securely. Once you’ve located the studs, you can attach a 2×4 at your desired height. This will serve as the foundation for your shelves, so it’s important that it’s level and strong.
Gather your materials, including sturdy 2×4 lumber, and locate your wall studs for secure shelf attachment.
Next, cut additional 2x4s to create the legs for your shelf. These should be long enough to provide adequate support without any wobbling. Once you’ve cut your legs, secure them to the foundation with 3-inch screws. This step is key to ensuring that your shelf can hold the weight of whatever you plan to store.
After you’ve got the legs in place, you can attach horizontal 2x4s for the length of the shelves. Use only two screws per board for efficient assembly, keeping it simple and effective.
Now that the framework is coming together, it’s time to add the shelving. Cut your plywood to fit on top of the 2×4 structure. Make sure it overhangs slightly for a nice finished look. Secure the plywood with smaller screws, ensuring it’s firmly attached to the frame. This step is essential for creating a solid surface that can hold books, decorations, or other items without bending.
Once everything is assembled, take a moment to admire your work. You’ve built a shelf that’s not only functional but also adds a personal touch to your space. If you’ve followed these steps carefully, you should have a sturdy and attractive addition to your home. To enhance your shelf’s aesthetic, consider incorporating rustic lighting that complements your farmhouse design.
Frequently Asked Questions
How Do You Make a Simple Wall Shelf?
To make a simple wall shelf, start by marking where you want it on the wall.
Use a stud finder to locate the studs for support.
Attach a horizontal 2×4 at your desired height with screws, ensuring it’s level.
Add more 2x4s for additional shelves if needed.
Cut and attach legs for stability, then place a plywood board on top and secure it with screws.
You’ll have a sturdy shelf in no time!
How Much Weight Can a DIY Floating Shelf Hold?
When it comes to floating shelves, you’ve got to know your limits.
Typically, a well-installed DIY floating shelf can hold between 15 to 50 pounds, depending on factors like the materials and brackets used.
If you anchor it into studs and choose sturdy materials like 3/4-inch plywood, you’ll boost its strength.
Just remember to distribute weight evenly to keep things from going south after you’ve put in all that effort!
What Can I Use to Make Cheap Shelves?
To make cheap shelves, you can use 2×4 lumber, which is affordable and easy to find at hardware stores.
Plywood serves as a sturdy surface, often at a lower cost than solid wood. You can also repurpose old pallets or crates for unique designs.
Don’t forget to check local thrift stores or online marketplaces for budget-friendly brackets or supports to enhance your shelves’ stability and appearance.
You’ll create functional storage without breaking the bank!
How to Do a Floating Shelf?
To create a floating shelf, start by choosing a sturdy piece of wood that’s about an inch thick.
Use a stud finder to locate and mark the wall studs for secure attachment.
Install the floating shelf hardware according to the instructions, ensuring you level the shelf as you go.
Once it’s secure, you can add your decorative items, distributing the weight evenly to keep it stable and looking great.
Conclusion
And there you have it! In just 30 seconds, you’ve created a shelf that’s perfect for displaying your collection of dust bunnies or your prized collection of expired coupons. Who knew DIY could be this thrilling? Forget about intricate carpentry; you’re now the proud owner of a shelf that’s as stable as your last relationship! So, grab your trusty hammer (or a shoe) and let your creativity run wild—because what could possibly go wrong in 30 seconds?