To stop drafts, start by inspecting your windows and doors for gaps, cracks, or looseness in the weatherstripping. Remove old, worn seals and replace them with foam tape, V-strip, or rubber gaskets that fit your needs. Confirm surfaces are clean before installation and press the new weatherstripping firmly into place. Regularly maintaining and checking your seals keeps drafts out and your home comfortable; continue with us to learn more about effective weatherstripping solutions.
Key Takeaways
- Inspect windows and doors for gaps, cracks, or damage to identify areas needing weatherstripping repair or replacement.
- Remove old or deteriorated weatherstripping thoroughly before installing new materials for a proper seal.
- Clean surfaces thoroughly to ensure adhesive-backed weatherstripping adheres securely and effectively seals gaps.
- Choose appropriate weatherstripping materials like foam tape, V-strip, or rubber gaskets based on the gap size and location.
- Install new weatherstripping carefully, ensuring no overlaps or gaps, and test for drafts to confirm a tight seal.
Weatherstripping plays a crucial role in keeping your home energy-efficient by sealing gaps around doors and windows. When you focus on proper window insulation and door sealing, you prevent drafts from sneaking inside, which can considerably reduce your heating and cooling costs. Over time, weatherstripping can wear out, crack, or become compressed, making it less effective. That’s when repairing or replacing it becomes necessary to maintain your home’s comfort and energy efficiency.
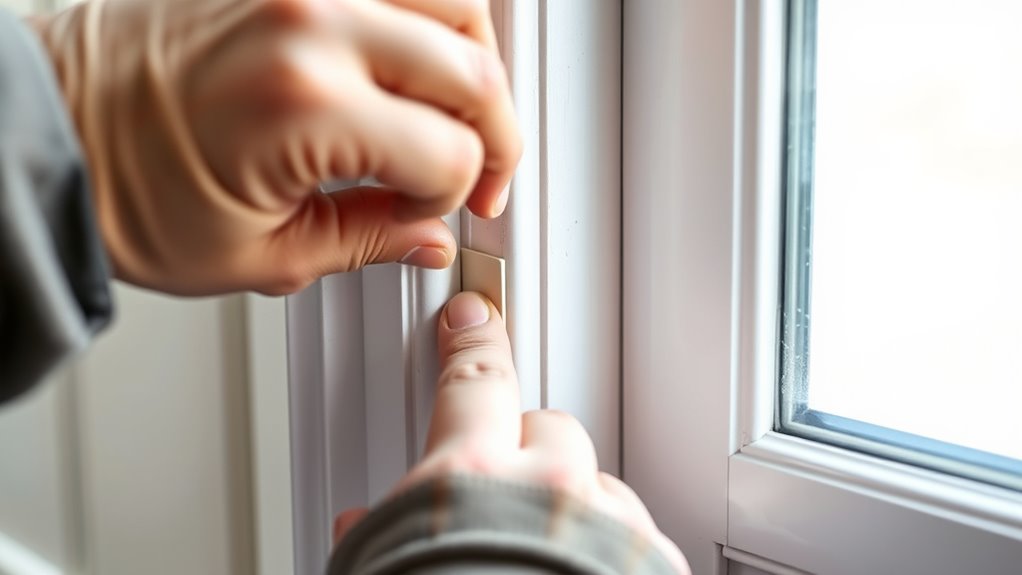
Start by inspecting your windows and doors carefully. Look for visible gaps, cracks, or areas where the weatherstripping has become loose or damaged. In some cases, you might notice drafts or feel cold air seeping through during colder months. When addressing window insulation, check the condition of the existing seal around the window frame. If it’s cracked or peeling, it’s time to replace it. New weatherstripping materials like foam tape, V-strip, or rubber gaskets can restore the seal and improve insulation. For door sealing, examine the perimeter of your doors—especially at the bottom and sides—for gaps. Replacing worn-out door sweeps or adding new weatherstripping strips can stop drafts effectively.
Applying new weatherstripping is straightforward but requires attention to detail. Clean the surfaces thoroughly before installation to ensure good adhesion. For adhesive-backed foam or rubber strips, peel off the backing and press firmly into place, ensuring there are no gaps or overlaps. For mechanical fasteners like nail-in or screw-in types, secure them tightly to prevent loosening over time. When sealing around windows, consider using caulk for small gaps, especially in areas where weatherstripping isn’t suitable. Proper window insulation not only keeps drafts out but also enhances your home’s overall thermal performance. Additionally, incorporating air purifiers can help improve indoor air quality by reducing airborne pollutants that may enter through unsealed gaps.

Frost King R734H Sponge Rubber Foam Tape 3/4" W X 7/16" H X 10' L, Black
The product is 3/4×7/16 BLK SpongeTape
As an affiliate, we earn on qualifying purchases.
As an affiliate, we earn on qualifying purchases.
Frequently Asked Questions
How Often Should Weatherstripping Be Inspected for Damage?
You should inspect your weatherstripping at least twice a year, aligning with your seasonal maintenance schedule. Regular seasonal inspections help you catch damage early before drafts become a problem. Look for cracks, tears, or gaps, and replace worn weatherstripping promptly. Staying consistent with these inspections guarantees your home stays energy-efficient and comfortable year-round, preventing costly drafts and energy loss.
Can Weatherstripping Be Repaired or Does It Always Need Replacing?
Did you know that properly sealed weatherstripping can save up to 15% on energy bills? You can often fix weatherstripping with DIY fixes, especially for minor damage. Some weatherstripping types, like foam tape, are easy to repair, while others, such as rubber or metal, may need replacing. Check for damage first—if it’s torn or worn out, replacing is your best bet for an airtight seal.
What Are the Signs That My Weatherstripping Needs Replacing?
You’ll notice draft detection around windows or doors when you feel cold air or see gaps. If your heating or cooling bills are rising without reason, it’s a sign of energy loss due to worn weatherstripping. Also, if the weatherstripping is cracked, brittle, or missing in sections, it’s time to supplant it. Addressing these signs ensures your home stays comfortable and energy-efficient.
Does Weatherstripping Require Special Tools for Installation?
You don’t need special tools for weatherstripping installation, but having a few handy can make the job easier. Gather scissors or a utility knife for cutting, a measuring tape for accuracy, and possibly a pry bar if removing old stripping. Follow installation tips like cleaning the surface first and ensuring a snug fit. With these tools and tips, you can efficiently stop drafts and improve your home’s energy efficiency.
How Long Does Weatherstripping Typically Last Before Replacement?
Sure, your weatherstripping’s lifespan depends on material durability, but usually, it lasts about 5 to 10 years before needing a refresh. Think of it as your home’s way of saying, “I’ve had enough,” after enduring sun, rain, and drafts. Proper installation lifespan is key; if you rush or skimp, it might fail sooner. So, keep an eye on it, and replace when drafts sneak back in—your wallet will thank you.

MAXTID Under Door Draft Stopper for Bottom of Doors 38" Black Door Blocker Noise ReducerLight Cold Air Guard Breeze Sound Proof Door Sweep Weather Stripping Door Seal Insulation Strip Gap Filler
Double Sided Door Draft Stopper: Reduce drafts and cold so helping to keep your energy bills down
As an affiliate, we earn on qualifying purchases.
As an affiliate, we earn on qualifying purchases.
Conclusion
Now that you know how to repair and replace weatherstripping, you’re well on your way to stopping drafts in their tracks. Keeping your home sealed tight not only boosts energy efficiency but also saves you money. Don’t let small gaps turn into big problems—nip them in the bud before they become a headache. With these simple fixes, you’ll be cozy inside while the outside world stays where it belongs—out!

Window Weatherstrip Seal 1/4" Bulb Bubble Kerf Mount Bulb Gasket Window Weather Stripping Kerf – 4 Colors and 5 Length Options (10', White)
Details and Specifications:kerf window weather stripping size -1/4"bulb diameter,standard 3/16” kerf weatherstrip depth and 1/8”kerf width, weather stripping…
As an affiliate, we earn on qualifying purchases.
As an affiliate, we earn on qualifying purchases.

Vellure® Door Draft Stopper for Bottom of Door – Premium Door Sweep for Bottom of Door/Weather Stripping Door Seal (Save Energy – installs Quickly and Easily) Door Strip Ideal for
BLOCK DRAFTS EFFECTIVELY – High-quality door draft stopper made from industry-grade silicone with exceptionally strong adhesive. Our door…
As an affiliate, we earn on qualifying purchases.
As an affiliate, we earn on qualifying purchases.